Hello again! I'm back, and this time I'm going to be sharing my projects from my Perspective class. Hope you enjoy!
 |
| Project 1: Our first project was to draw rectangular and triangular shapes in one-point perspective. This means that all shapes need to seem like they are originating from a single point, called the vanishing point. |
 |
| Project 2: Once we understood the idea of drawing angular shapes in one-point perspective, the next step would be to draw cylindrical shapes originating from a single point. |
 |
| Project 3: With the concept of one-point perspective learned, the next step was to learn two-point perspective. Like one-point perspective, two-point perspective involved drawing objects so that they appear to be disappearing towards a vanishing point, except in this case there were 2 vanishing points place on the "horizon line." This line creates the threshold for which certain sides of shapes are visible. In addition to drawing the shapes, the instructor required us to make several of the shapes "opaque" by erasing lines that would normally be hidden from view. |
 |
| Project 4: Our next project consisted of drawing a building and sidewalks using two-point perspective. |
 |
| Project 5: Using one- or two-point perspective, we were required to observe and draw a piece of furniture at a certain angle. |
 |
| Project 6, part 1: The next step after learning two-point perspective was, of course, three-point perspective. Three-point perspective is the perspective that is most commonly seen in nature, but it is also the trickiest. Like two-point perspective, three-point perspective utilizes two vanishing points on a horizon line. In addition, a third vanishing point is placed below (known as Bird's-eye) or above (Worm's-eye) the horizon line, from which all vertical lines are drawn. The above drawing consists of five shapes drawn in Bird's-Eye view. |
 |
| Project 6, part 2: This drawing is of four shapes drawn in Worm's-Eye view. |
 |
| Project 7: Our next project consisted of drawing buildings from either a Worm's-Eye or a Bird's-Eye view. I chose to do Worm's-Eye because I wanted to be able to play with the perspective of the sidewalk a bit. |
 |
| Project 8: With the theory of perspective learned, the next step was to practice the effects. Our instructor created a set of photos that consisted of various objects on a table being lit by a single light source. We had to redraw that picture so that we could get an accurate vision of how perspective influences shadows. |
 |
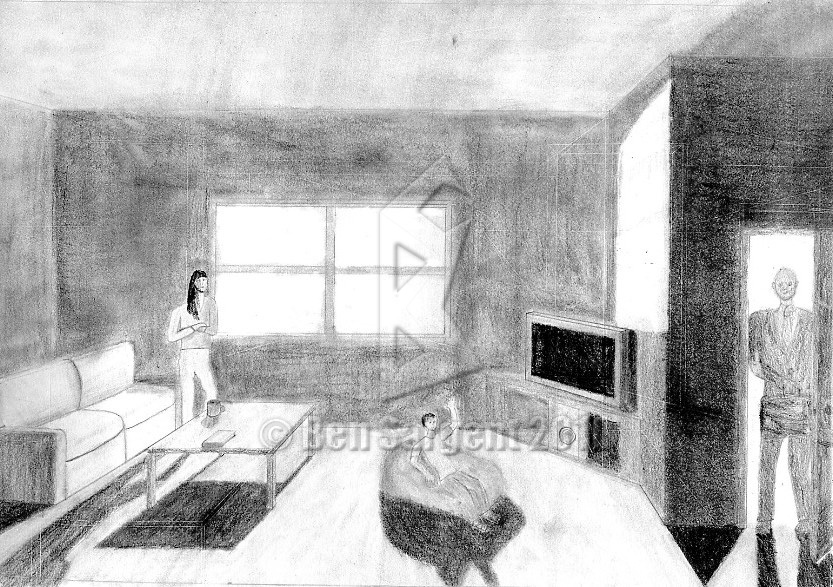
| Project 9, part 1: Our next project would be a practical study of the previous assignment. We were to create a room interior (using either one- or two-point perspective) with furniture, including at least 3 human figures (drawn using scaling techniques; I still haven't taken a figure-drawing course, so I apologize for the cartoonish-ness of the people), create a light source, and draw the shadows as we thought they would fall. |
 |
| Project 9, part 2: Once our rooms had been drawn, we were required to use the shading techniques we learned and add value to the drawing. |
 |
| Final project - Thumbnails: Our final project was our chance to create whatever we wanted to create using the skills we had learned. With memories of my short trip to Europe still relatively fresh in my brain, I decided that I wanted to try to draw a cathedral like many that I had seen while on tour. This turned out to be quite a challenge. |
 |
| Final project - Rough lines and shapes: Choosing my favorite thumbnail, I began drawing the buildings and the shadows for my final project. I chose to use three-point perspective for my drawing, to give it a proper sense of depth and size. However, in order to make the drawing appear realistic, it was necessary for me to place the bottom vanishing point far below the page, which required an extra sheet of paper and a long ruler. |
 |
| Final project - Filling it in: my next step was to begin the process of shading the drawing and adding value to it. I had trouble in a few areas, however, because the vision in my head wasn't quite translating to the page. With some helpful advice from my teacher and classmates, however, I was able to clean them up enough for... |
 |
| The Final Product: I changed the direction of a couple of my shadows following the advice of my instructor, and I also began including some realistic elements; e.g. the tile on the roof, bricks on the corner of the cathedral, etc. It's not quite what I'd hoped it would be, but I've still got quite a bit of learning to do, so hopefully I will be able to come back one day and give it the treatment it deserves. |
And that's a wrap! I hope you liked looking through my drawings (and learning a few things about perspective along the way). I'll be back tomorrow with art from my most recent class, Color Theory. Hope to see you then!


cool thanks for posting
ReplyDelete